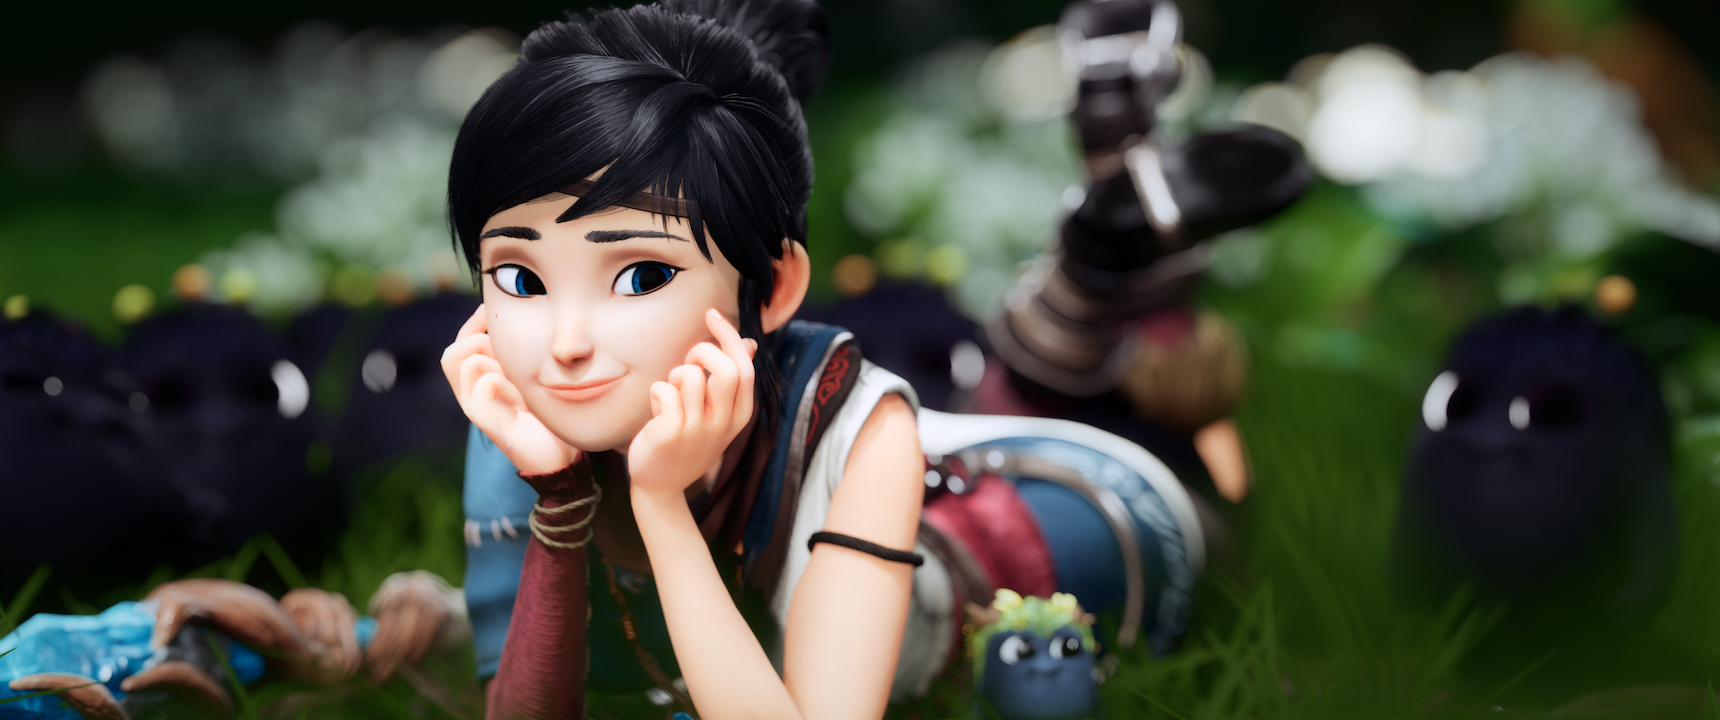
Multi-sampled Accumulated Depth of Field (MSADOF) is an advanced DOF add-on for ReShade developed by murchalloo. It renders depth of field without using a depth buffer for the blurring process, greatly increasing the possibilities of defocused captures. This is an advanced guide that aims to cover the usage of MSADOF, as well as its setup process for you and other users.
Since the guide was written, Otis_inf has developed his own accumulated DOF, which works very similarly to MSADOF with a more user-friendly workflow (meaning that the advantages also apply to it). However, differently from MSADOF, IGCSDOF has been released to the public.
You can get it from here, as well as read about how it works and how to use it.
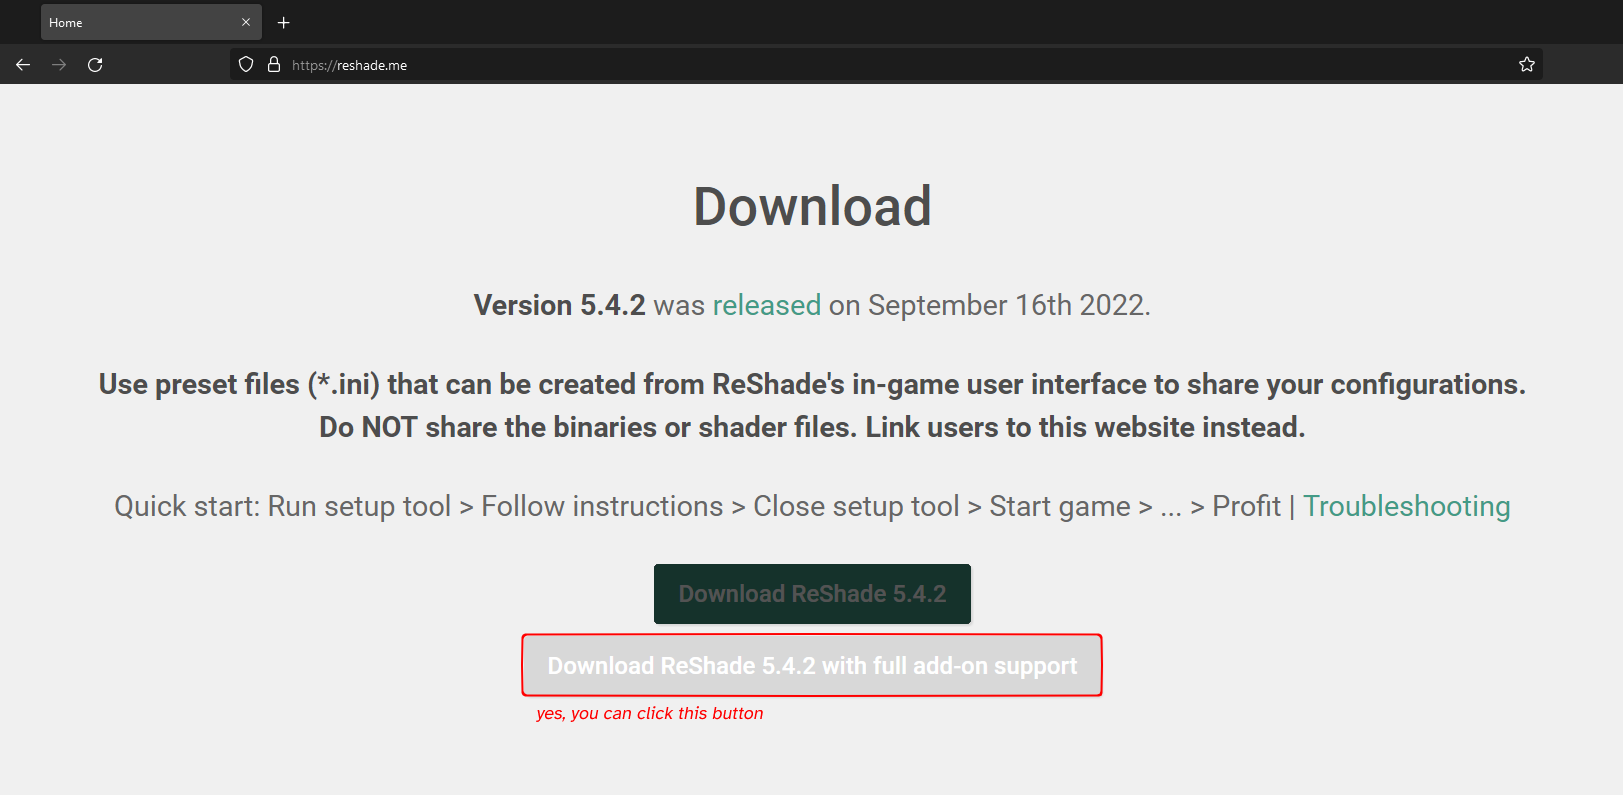
MSADOF requires ReShade 5.4.2+ with full add-on support and supported Otis_Inf camera tools. All cameras newer than the 31st of May 2022 should have support for MSADOF, look for "Supports IGCS Connector" in the "Versions and compatibility" table of each game.
MSADOF Beta 0.9.2 is currently in closed beta and is unavailable for public download.
Advantages
MSADOF works by manipulating the game camera around a certain plane in space and progressively blending the result to produce a defocused image that's depth-accurate. This results in:
MSADOF
Traditional depth-based DOF

Accurate near-plane bleed.
MSADOF
Traditional depth-based DOF
Alpha hair in DOF!
MSADOF
Traditional depth-based DOF
Particle & alpha effects in DOF.
MSADOF
Traditional depth-based DOF
Depth-accurate reflections.
MSADOF

Traditional depth-based DOF
Layered defocusing of transparent and translucent materials.
Installation & initial setup
MSADOF_Beta_0.9.2.rar contains one file and two folders:
MSADOF.addonis the add-on itself.reshade-shadersis a folder that contains necessary ReShade shaders for the add-on to function.MSADOFis a folder that contains some default extras for MSADOF to use.
Standard install:
- Merge all files into the same folder as your ReShade DLL.
- Launch game.
Custom install:
- Merge
MSADOF.addonto the same folder as your ReShade DLL. - Merge
MSADOF.fxandMSADOF.fxh, both found inreshade-shaders, to your custom ReShade install. - The
MSADOFfolder can be placed anywhere convenient. It is also entirely optional to install, as the add-on can be configured to find / use any other folder on your system.
Once installed, upon opening the ReShade GUI, you will now see a new window. This is where you will control the bulk of MSADOF. You must also enable MSADOF_ADDON [MSADOF.fx] in your shaders list and drag it all the way to the bottom of the list. Depth buffer access is necessary for the full functionality of the add-on. The add-on should also show up under the Add-ons tab of the ReShade GUI.
For the add-on to function as intended, it's typically necessary to enable VSync or an FPS cap of around 30 in your game. This ensures consistent frame pacing for clean results. Motion blur should also be disabled.
MSADOF.addon must be renamed to IgcsConnector.addon to work in The Witcher 3: Wild Hunt. This is currently the only known occurrence of this exception.
List of preconfigured values
As setting MSADOF up from scratch can be tricky, this is a compilation of known MSADOF values for games that have been tested. With the GUI open, switch from the Photography Mode tab to the Tweaking Mode tab. Scroll down and expand Game Adjustments to add these values. You may also have to change some values in DOF Settings.
View list
The Frames to skip parameter is dependent on your own hardware and the current performance of the game. Tweak the value if you notice that the image isn't sharp or if there are visible rings forming.
| Game | Near Plane | FOV | VariableNear Plane | CameraMultiplier | Comments | |
|---|---|---|---|---|---|---|
| A Plague Tale: Requiem | 0.0490 | 180 | 0.001 | The near plane value only works reliably in photomode. | ||
| Ace Combat 7: Skies Unknown | 1.0000 | 180 | ✔ | 0.100 | ||
| Aliens: Fireteam Elite | 9.9965 | 180 | ✔ | 0.100 | ||
| Assassin's Creed Odyssey | 0.0995 | 180 | 0.001 | |||
| Atomic Heart | 2.0000 | 180 | ✔ | 0.100 | ||
| Assassin's Creed Origins | 0.0995 | 180 | 0.001 | |||
| Assassin's Creed Valhalla | 0.0995 | 180 | 0.001 | TAA can only be disabled via HxD. | ||
| Batman: Arkham Knight | 9.9965 | 180 | ✔ | 0.100 | ||
| Beyond a Steel Sky | 9.9965 | 180 | ✔ | 0.100 | ||
| Borderlands 3 | 9.9965 | 180 | ✔ | 0.100 | ||
| Blind Fate: Edo no Yami | 9.9965 | 180 | ✔ | 0.100 | ||
| Century: Age of Ashes | 5.625 | 180 | 0.1 | |||
| Chernobylite | 1.0000 | 180 | ✔ | 0.100 | ||
| CHORVS | 56.500 | 180 | ✔ | 0.100 | ||
| Close to the Sun | 1.0000 | 180 | ✔ | 0.001 | ||
| Code Vein | 9.9965 | 180 | ✔ | 0.100 | ||
| CRISIS CORE –FINAL FANTASY VII– REUNION | View values by chapterPrologue cutscenes: 10Prologue gameplay: 0.65248 Chapter 1 cutscenes: 27.95 Chapter 2 cutscenes: 16.9 Chapter 2 gameplay: 0.562970 Chapter 3 cutscenes city: 22.7 Chapter 3 Mako reactor: 84.5 / 16.76 |
View values by chapterPrologue cutscenes: 130Prologue gameplay: 180 |
✔ | 0.100 | The near plane value (as well as the fov value) changes between chapters and between gameplay and cutscenes, so change the values accordingly. Also, chapter 2 has a higher chance of crashing when hotsampling. | |
| Cyberpunk 2077 | 0.0200 | 180 | 0.001 | Might require raytracing / a low framerate under VSync targets. | ||
| Days Gone | 9.9500 | 320 | 0.100 | Setting AA to 0 will result in a loss of HUD and console access. | ||
| Dead Island 2 | 9.9950 | 180 | ✔ | 0.100 | ||
| Dead Space Remake | 0.055168 | 180 | 0.001 | The Frames to Skip can vary a bit but usually its 1 - 3. | ||
| Death Stranding: Director's Cut | 0.1123 | 180 | 0.001 | The game will crash after a render in photomode, near plane changes constantly in cutscenes and its recommended to turn on the 30fps cap. | ||
| Draugen | 9.9965 | 180 | ✔ | 0.100 | ||
| ECHO | 0.5600 | 180 | 0.100 | No custom AR possible. | ||
| Elden Ring | 0.0500 | 180 | 0.001 | Camera multiplier can change from area to area. In-game antialiasing can cause blurry results. | ||
| Final Fantasy VII Remake Intergrade | 5.6250 | 180 | 0.100 | |||
| Harvestella | 9.9965 | 180 | ✔ | 0.1-1 | ||
| Hellblade: Senua's Sacrifice | 9.9965 | 180 | ✔ | 0.100 | ||
| Hogwarts Legacy | 9.9950 | 180 | ✔ | 0.101 | It is recommended to turn off VSync. | |
| Kena: Bridge of Spirits | 9.9965 | 180 | ✔ | 0.100 | The near plane value only works reliably in photomode. | |
| Life is Strange: True Colors | 9.9965 | 180 | ✔ | 0.100 | ||
| Marvel's Spider-Man Remastered | 0.0775 | 140 | ✔ | 0.001 | ||
| Mortal Shell | 9.9965 | 180 | ✔ | 0.100 | ||
| MotoGP 19 | 9.9965 | 180 | ✔ | 0.100 | ||
| Observer: System Redux | 9.9965 | 180 | ✔ | 0.100 | ||
| Omno | 9.9965 | 180 | ✔ | 0.100 | ||
| OverDrift Festival | 5.624 | 180 | ✔ | 0.100 | ||
| Resident Evil 2 (DX12) | 0.0100 | 180 | ✔ | 0.001 | ||
| Resident Evil 3 (DX12) | 0.0100 | 180 | ✔ | 0.001 | ||
| Resident Evil 4 | 0.0100 | 180 | ✔ | 0.001 | ||
| Returnal | 9.9950 | 180 | ✔ | 0.100 | Works at 16:9, different AR's need different frameskips. | |
| SCARLET NEXUS | 9.9965 | 180 | ✔ | 0.100 | ||
| Scorn | 3.0000 | 180 | ✔ | 0.010 | ||
| Sifu | 9.9965 | 180 | ✔ | 0.100 | ||
| Space Hulk: Deathwing | 5.0 | 180 | 0.100 | May need to play with the FramesToSkip value per situation. I found that setting of 1 worked most times but 0 was sometimes required to stop the fuzzy donuts. | ||
| Spirit of the North | 9.9965 | 180 | ✔ | 0.100 | ||
| Star Wars Jedi: Fallen Order | 9.9995 | 180 | 0.100 | |||
| Stray | 0.5625 | 180 | 0.100 | |||
| Tales of Arise | 9.9965 | 180 | ✔ | 0.100 | ||
| Tell Me Why | 9.9965 | 180 | ✔ | 0.100 | ||
| The Ascent | 9.9965 | 180 | ✔ | 0.100 | ||
| The Last of Us Part I | 0.135000 | 180 | 0.001 | For cutscenes and photomode you might want to use 0.121500 as a near plane value. Also make sure to disable TAA. | ||
| The Medium | 2.0000 | 180 | ✔ | 0.100 | ||
| The Outer Worlds | 1.2700 | 180 | 0.100 | |||
| The Pathless | 9.9965 | 180 | ✔ | 0.100 | ||
| The Shore | 9.9965 | 180 | ✔ | 0.100 | ||
| The Sojourn | 9.9965 | 180 | ✔ | 0.100 | ||
| The Witcher 3: Wild Hunt | 0.2000 | 180 | 0.001 | Near plane may switch to 0.4 in cutscenes. | ||
| Twin Mirror | 9.9965 | 180 | ✔ | 0.100 | ||
| Uncharted 4 | View values by chapterChapter 1: 0.2385Chapter 2: 0.2400 Chapter 3: 0.1000 Chapter 4: 0.2400 Chapter 5: 0.2400 Chapter 6: 0.2400 Chapter 7: 0.2400 Chapter 15: 0.2400 Chapter 16: 0.2400 Chapter 17: 0.27-0.29 Chapter 18: 0.235-0.24 Chapter 20: 0.235-0.24 Chapter 22: 0.20 Epilogue: 0.20 |
180 | ✔ | 0.100 | The near plane values change between chapters (and sometimes even so within the same chapter), so change the value accordingly. Also, the value might change when using different aspect ratios. If the results are blurry when changing AR, make sure to uncheck and recheck the variable near plane box, and then refocus. If that doesn't fix it then start playing with the near plane value itself. | |
| Vampire: The Masquerade - Swansong | 1.0000 | 180 | ✔ | 0.100 | ||
| Visage | 9.9965 | 180 | ✔ | 0.100 | ||
| Way of the Hunter | 1.0000 | 180 | ✔ | 0.100 |
Have some game adjustments values that you want to include? Head up to the issue site page and create an issue with the values, or contact one of the mods.
If you have to setup & adjust for a new game, follow the advanced setup section further below.
Usage
The add-on has four tabs in total. Photography Mode and Tweaking Mode are where you can expect to spend most of your time. Photography Mode offers a simple UI for controlling all the necessary values once the add-on is configured, while Tweaking Mode is a more advanced set of controls for configuration and tweaking. Shape Settings and Settings are additional configuration tabs for setting up bokeh shape and general setup for the add-on itself.
Don't see all four tabs? The camera tools have to be injected first!
Once the add-on is configured and with the freecam active, press Ctrl+B to begin a render. The final image is automatically saved to the same folder where your game EXE is located, but a custom save path can be set in the Settings tab.
The add-on also supports hotsampling! Simply start the render after hotsampling.
Photography Mode
This is the tab for controlling the add-on in a simplified manner. The controls are similar to that of a real camera. Values set in Tweaking Mode override those set in this mode.
Camera/Lens Settings

Focal Length
The add-on translates the FOV it receives from the camera tool to focal length in 35mm equivalent. Useful for approximating real life focal lengths.
This isn't an accurate value!
The camera tools, and by extension MSADOF itself, have no knowledge of the game world's scale in relation to real life. Game engines also rarely make obvious whether its primary FOV component is horizontal or vertical (or even diagonal!). This means that while MSADOF is physically-based, it cannot accurately reproduce real-world figures and would be unreliable in use as a real-world simulation.
Aperture Size
A readout of how large the bokeh size will be. Translates to Shape size in Tweaking Mode.
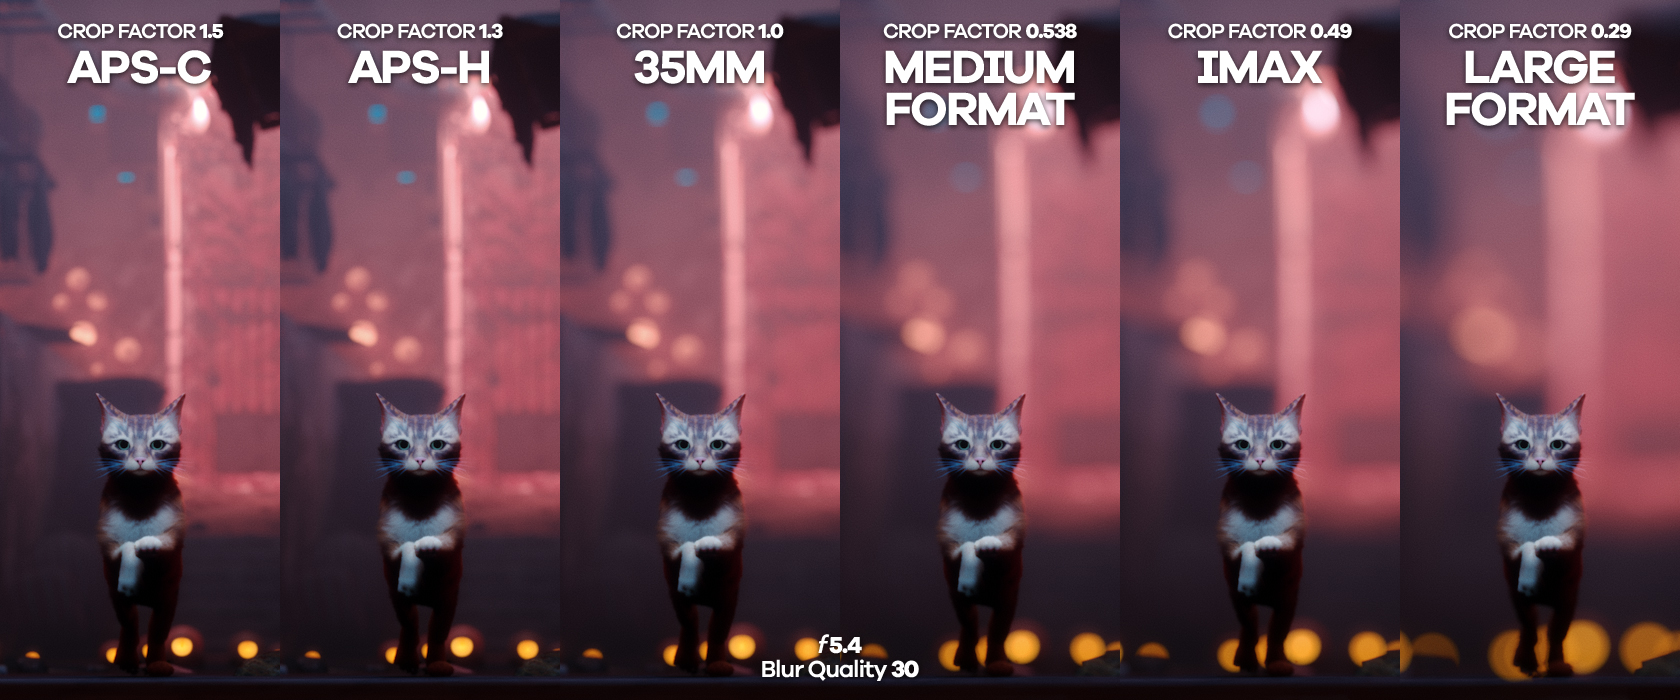
Sensor Size
This is a dropdown list of sensor sizes for the add-on to simulate. Acts as a 'multiplier' to aperture size, picking a smaller sensor with a higher crop factor (CF value) makes bokeh circles smaller and vice versa.
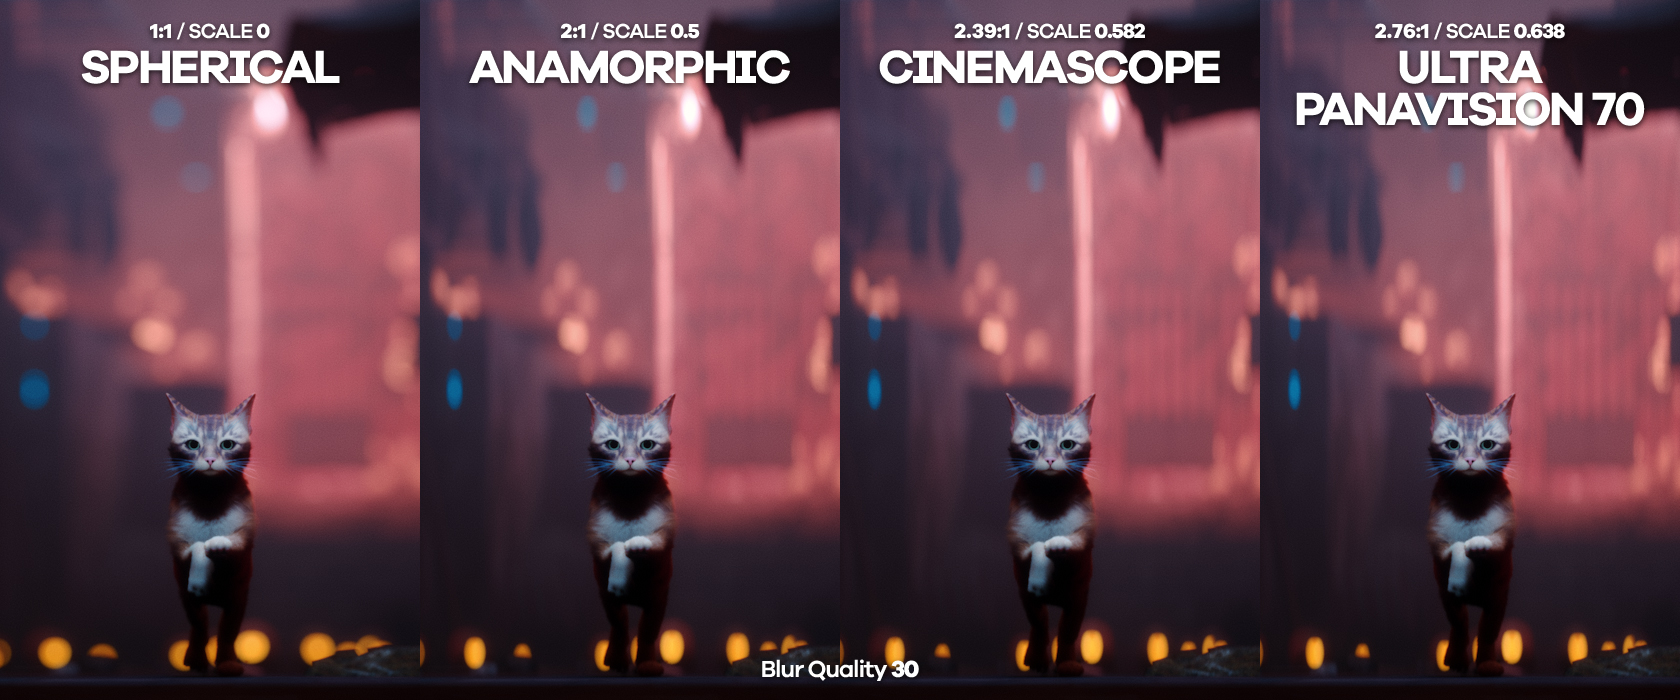
Aspect Ratio
This is a dropdown list of some common filmic aspect ratios. These affect the shape of your bokeh circles. Useful for quickly switching from spherical bokeh to anamorphic oval bokeh.
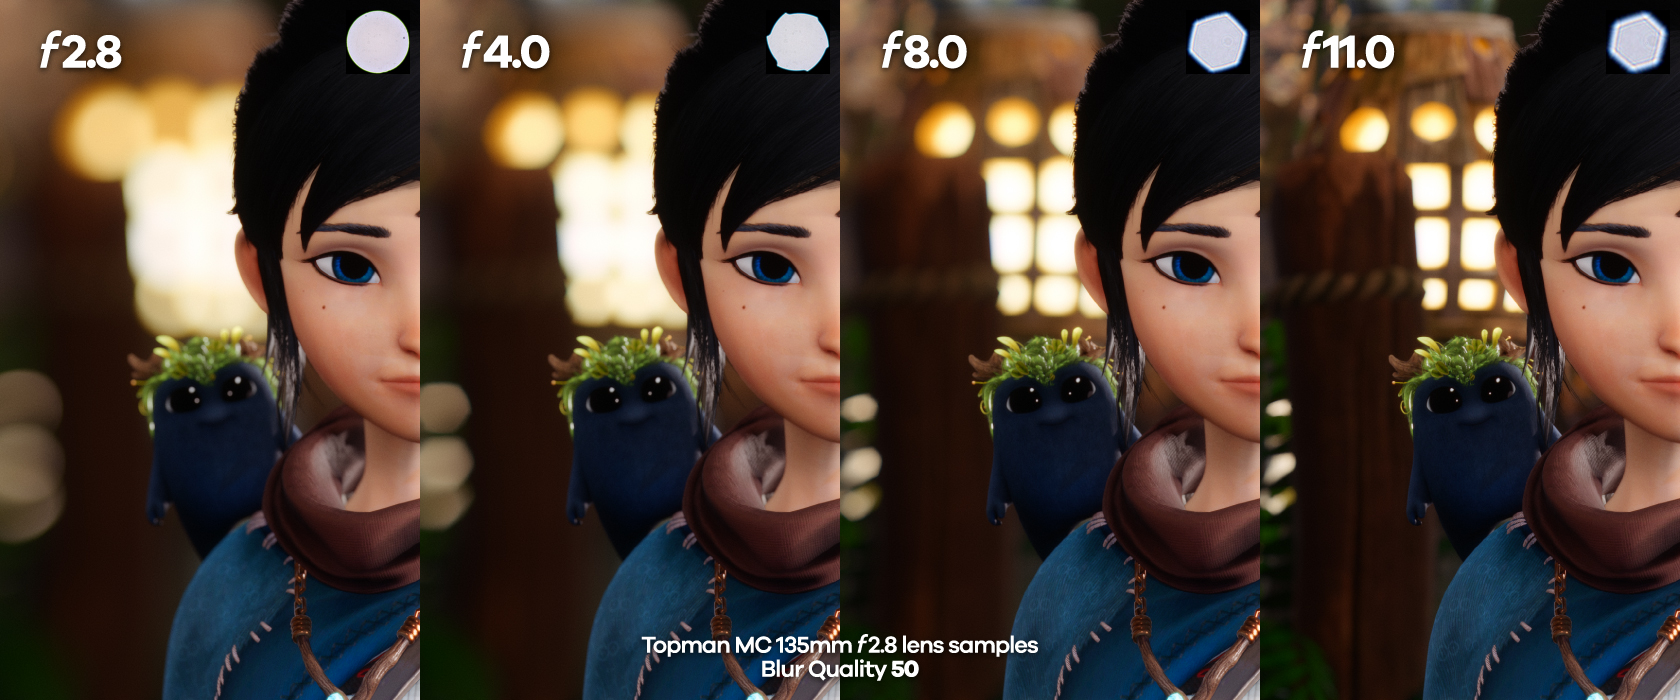
f-Number
This sets the aperture size. A smaller f-Number means larger bokeh.
Autofocus (Middle Mouse Button)
This toggle sets an autofocus point when the middle mouse button is held down. The add-on will continue to autofocus on that spot as long as the ReShade GUI is open.
Focus distance
This sets the focal plane, allowing you to focus manually. The arrows on the right change the step size of the slider.
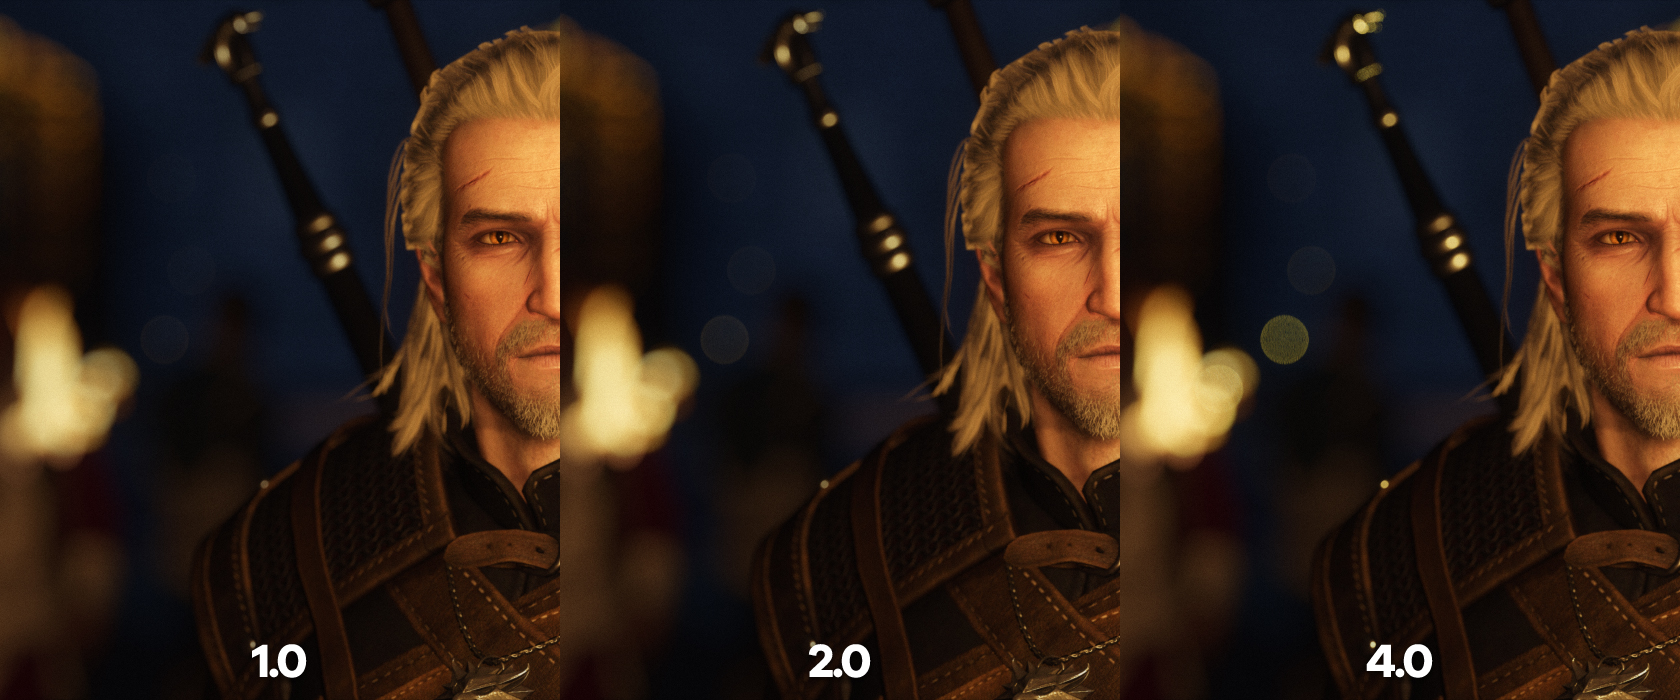
Blur Quality
This sets how many samples are taken by the add-on, drastically affecting render times. Increase it if you notice undersampling (each point is clearly visible), decrease it if render times are taking too long. Translates to Number of rings in Tweaking Mode.
Helpers Settings
Show focus plane
Overlays a plane on screen. Where the plane cuts the scene is where the focus distance is set.
Show rendering progress
Displays a progress bar.
Tweaking Mode
This is the tab for controlling the add-on in an advanced manner.
DOF Settings
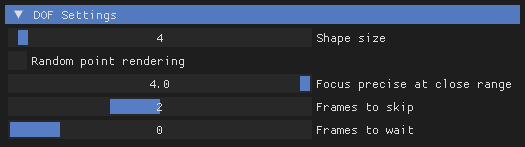
Shape size
This controls how large your bokeh will be.
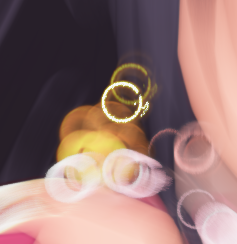
Random point rendering
Instead of a progressive spiral sampling path, this causes the add-on sample randomly. This can be useful for previewing how large the resulting bokeh will be, or can be used to mitigate animating background elements interrupting the render.
This feature is not currently working as intended and occasionally produces ghosts of the focus plane.

This example has been sped up by 8x.
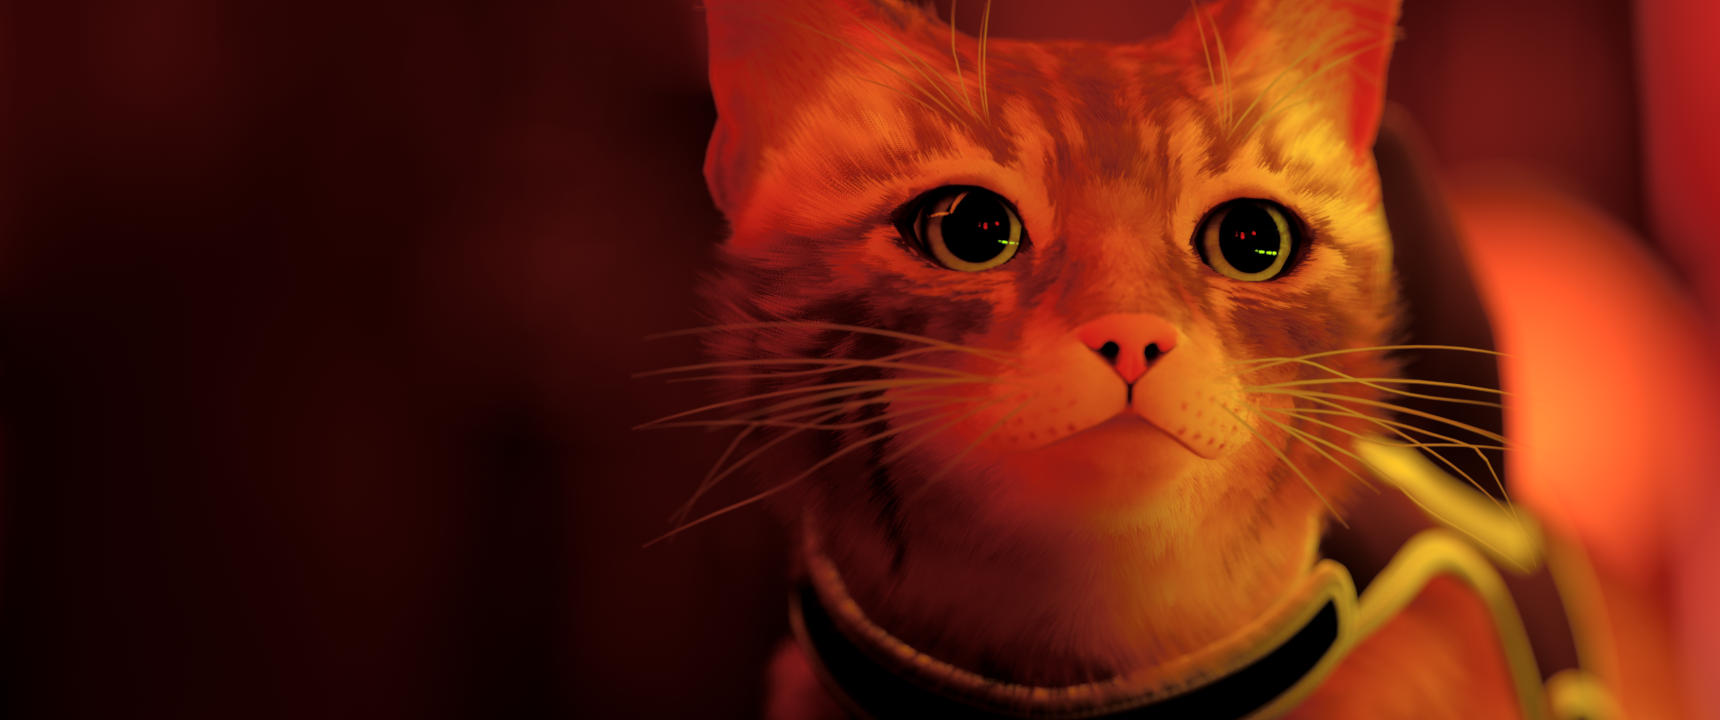
Focus precise at close range
This changes the scaling of the focus distance slider. Higher values mean that the focus distance slider can operate in even smaller steps closer to the camera. This is useful for portraits, where extra focus precision is desired.
Frames to skip
Skips camera movement of every few frames to make accumulation more consistent. Depending on the performance of your game, this value might have to be changed. If you notice that the add-on is drawing rings/donuts on your focus plane, this value likely has to be changed.
Frames to wait
Similar to above, this value should only be changed if you notice that the focus plane isn't properly sharp.
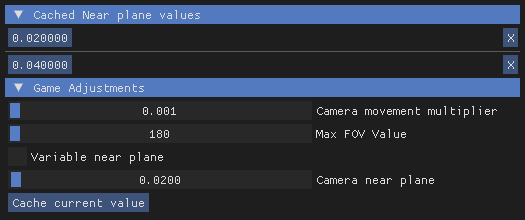
Game Adjustments
This category can mostly be left alone, as it is for first time configuration of a new game. See the section below on how to tweak it.
Camera movement multiplier
Sets how fast the camera will move based on a multiplier applied to camera coordinate scale. Turn this up to exaggerate shape size, or turn it down to reduce it.
Max FOV Value
The maximum FOV value that MSADOF will use for its calculations.
Variable near plane
Changes how Camera near plane is calculated if a change in aspect ratio causes Camera near plane to change as well.
Camera near plane
Offsets the distance of the near plane from the in-game camera. This is primarily used in aligning the focus plane to a known focus distance.
Cache current value
Writes the current near plane value to MSADOF_CACHE.ini and displays the cached values in a new list just directly above this category. This is useful for games that have changing Camera near plane values, like The Witcher 3.
Unused settings
This category does not need to be tweaked.
Flip X / Y
Fixes bokeh shape based on camera movement axes. The default setting of flipped X and unflipped Y appears to be standard across all games.
Shape settings
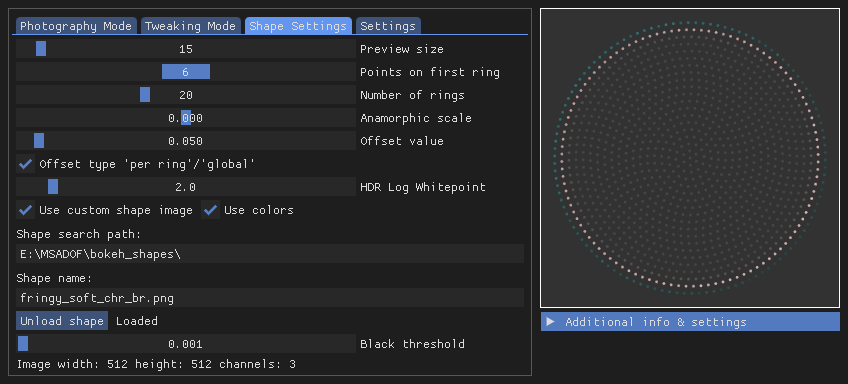
This tab configures the shape of the bokeh circles. A preview of the shape can be seen on the right side of the UI.
Preview size
Changes the scale of each point only in the preview window beside it.
Points on first ring
This sets the density of the points on each ring. This affects render time.
Number of rings
Changes the number of rings in each bokeh circle. This value affects render time. Increase it if you notice undersampling (each point is clearly visible), decrease it if render times are taking too long.
Anamorphic scale
Stretches/squashes the bokeh circle. Useful for replicating oval bokeh characteristic of anamorphic lenses.
Offset value / Offset type
Affects the alignment of every point relative to the previous ring. Tweak if there's an obvious pattern forming in your bokeh.
HDR Log Whitepoint
Affects how bright pixels stack atop each other during the accumulation process. The default value of 2.0 provides the most natural highlighting.
Use custom shape image
Checking this allows MSADOF to sample custom images that drive fringing and bokeh shape, allowing you to mimic bladed apertures or other more creative effects.

6-bladed aperture shape input.

Custom heart shape input.
A higher ring count is typically necessary for detailed shapes to be accurately sampled. The shape preview on the right is useful for determining if the shape is sufficiently detailed.
Due to how the add-on works, shaped bokeh in the near plane will be upside-down.
Use colors
When this is checked, the render will sample the input colors of the bokeh shape. This can be used to introduce chromatic fringing to bokeh, or with certain inputs, some unique depth separation effects.

It might be hard to spot, but the bokeh circles now have a subtle blue fringe.

A cyan-magenta-yellow 'tri-aperture' input was used here to create... whatever this is.
Shape search path
The file path to the folder that MSADOF will look for images in.
Shape name
The name of the image file for MSADOF to load as a custom shape. The file must be in PNG, JPG or BMP format.
Load shape
This button must be pressed to load the image into MSADOF. The preview window on the right will update accordingly.
Black threshold
The luminance value of the darkest pixel that MSADOF will sample. Anything darker than this value will be skipped in the render to save on render time.
More bokeh shapes
While the standard MSADOF download comes with a few custom shapes for you to try out, this is a pack of additional shapes curated by moyevka for you to play with!
Fun shapes!
The bokeh_shapes\Fun folder includes a handful of creative shapes such as the fringed heart seen above and some common "bokeh kit" shapes like stars and other symbols. Also included are some tinted multi-apertures to recreate anaglyph-style images.

For that one guy that still owns a pair of those cellophane 3D glasses.
Lens Samples
The bokeh_shapes\Lens Samples folder is a set of inputs sampled from real lenses at different focal lengths and apertures, curating a repository of realistic bladed aperture shapes and bokeh fringes.
Bokeh measurements by MattGunn2010 on Flickr, from PentaxForums. The sets have been edited to ensure complete compatibility with MSADOF.
Making your own custom shapes
MSADOF accepts any square image as a custom shape input, however it has to fit within the bounds of a circle that fits within the square.
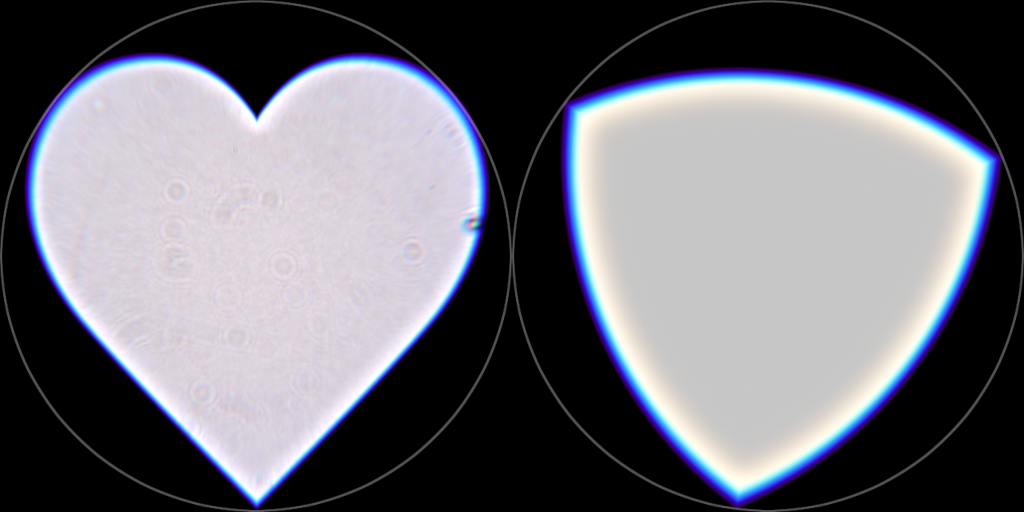
These heart and reuleaux triangle inputs may look strangely off-centered compared to their bounding squares, but circle overlays reveal that they fit nicely within the circular bounds that MSADOF will consider during custom image sampling.
Additional info
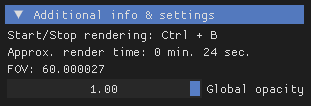
This category displays miscellanous information.
FOV
Field of view value as obtained through the camera tools.
Global opacity
This controls the global opacity of all ReShade windows (overrides Global alpha in the ReShade Settings tab).
This value is not written to ReShade.ini and reloading ReShade will restore your initial Global alpha value.
Settings
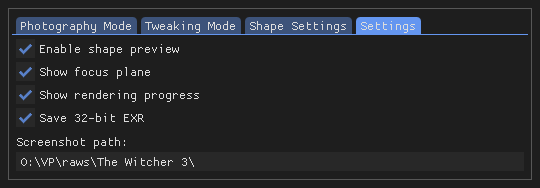
This is the tab where the add-on can be further configured.
Enable shape preview
Toggles the shape preview window on the right.
Show focus plane
Overlays a plane on screen. Where the plane cuts the scene is where the focus distance is set.
Show rendering progress
Displays a progress bar.
Save 32-bit EXR
As the accumulation process can introduce banding, this option stacks the accumulated frames into a higher-precision buffer. This buffer is saved into a high bit-depth (32-bit) EXR, which is able to store 65536x more colours than the standard BMP. This results in much smoother gradients with zero banding, and comes with the added benefit of having much more colour data for colour grading in post. The saved EXR requires further post-processing to produce the intended result.
Processed EXR
BMP capture

A colour-graded shot from Stray. Banding is visible in the left half of the image.
Screenshot path
A custom screenshot save path can be pasted here. The path has to end with \.
Shader settings
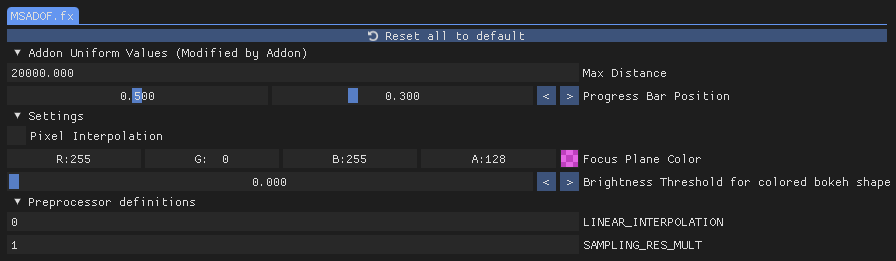
MSADOF_ADDON [MSADOF.fx] includes additional controls that affect the accumulation process as well as some basic quality of life features.
Max Distance
Max distance used by the add-on. Not necessary to tweak.
Progress Bar Position
This adjusts the position of the progress bar when Show rendering progress is toggled. Useful for monitoring rendering progress with hotsampled windows, for example.
Pixel Interpolation
Switches accumulation interpolation type to pixel. Affects the look of sampled points in bokeh, especially at a low blur quality.
Focus Plane Color
Adjusts the color and opacity of the focus plane when Show focus plane is toggled.
Brightness Threshold for colored bokeh shape
Sets a threshold for the brightest pixel sampled from a colored bokeh shape. This affects the brightness of accumulated bokeh.
LINEAR_INTERPOLATION
Switches accumulation interpolation type to linear. Affects the look of sampled points in bokeh, especially at a low blur quality.
SAMPLING_RES_MULT
Sets a multiplier to construct a higher resolution image out of the data accumulated from the camera movements. Affects file save times.
This feature is currently experimental and does not necessarily result in higher image quality.
Adjusting for a new game
If you're playing a game that does not have known values yet or the values produce wrong results on your end, this is the process of setting up the Game Adjustments tab.
1. Max FOV Value
Set your game to run in a 1:1 aspect ratio. With Additional info expanded, keep your eye on FOV. With the tool's free camera active, zoom out until the image flips. Note the FOV value at which the flip occurs - this is the Max FOV Value.
This value is typically 180 and shouldn't need to be tweaked unless you figure something's wrong.
2. Calibrating the focus plane
This step requires quite a bit of trial & error, as it involves messing with Focus distance until the focus plane is found. A high amount of blur (large Shape size / Camera movement multiplier) is recommended to help pinpoint the focus point.
If you're struggling to find an area in focus and the results are consistently blurry, you might have to configure Frames to skip. The add-on drawing rings/donuts is usually a tell-tale sign of this.
Once you've managed to find the focus plane, adjust Camera near plane with Show focus plane ticked until the focus helper plane aligns with the actual focus plane.
Motion blur (and some TAA implementations) can interfere with this part, causing your results to be blurry no matter what. Be sure to disable them if you're still having trouble.
3. Variable Near Plane
This checkbox should be ticked if the focus helper no longer aligns with the focus distance when the aspect ratio is changed.
Done!
This process acts as calibration of the focus helper plane to the actual focus plane, so it can be used to help you set a focus point.
Video Example
Does not cover Max FOV Value or Variable near plane.
Tips & Tricks
Best-case scenario
To get the best possible result out of this add-on, it's best to find a game that can perfectly timestop with no significant jitter, foliage sway, or anything that could interrupt the render.
Raytracing / specular highlight noise is often the cause of 'dirty' bokeh circles.
Preview bokeh size
You can perform a quick preview of how large your bokeh shape size will be by doing a render with a very low Number of rings or at a lower resolution. Random point rendering is also very useful for this.
Antialiasing & image sharpness
The camera-based nature of the shader means it does its own antialiasing! AA can be entirely disabled in your game to get a sharper image. This also works great with games that have temporally-dependent shaders too, like Cyberpunk 2077's hair shading, as MSADOF is technically a temporal technique as well.
It is not recommended to have a sharpening pass prior to the render. Sharpening halos may become exaggerated and/or show up in the accumulation process.
Have fun with shaders!
This add-on works great with ReShade shaders too! In fact, using a LUT prior to the render and saving the result in EXR can reduce colour banding, thanks to the stacking process. Lens distortion effects like the fantastic PerfectPerspective.fx can also be captured.
Processing saved EXRs
Saved EXRs are in linear gamma (gamma 1.0). This causes them to look 'washed-out' when viewed with an image viewer. Most image viewers & converters will perform gamma correction for you when compressing them to an 8/16-bit format (e.g. opening it in Photoshop then immediately saving it as a PNG), resulting in an image with the expected colours.
If you would like to edit these 32-bit colours, a simple gamma correction of 0.454545... (repeating) returns an image at gamma 2.2, which is close enough to the original colours. This can be done with Image > Adjustments > Exposure... or with the Exposure adjustment layer in Photoshop, for example.

Some advanced editors like Nuke have viewport display gamma sliders that can be used instead.
You can then perform your edits atop this correction layer. Remember to disable it before exporting your final result to prevent an overdarkened image.
Nerd stuff: This isn't really an accurate process. Dividing gamma by 0.454545... only approximates the sRGB gamma curve, which is a little more complicated than gamma 2.2. If you really wanted an accurate conversion back to sRGB, you'd need to apply a colorspace transform from linear to sRGB. More advanced editors that deal in colorspaces will have a featureset to handle this. A profile can also be assigned to the image, such that it's always interpreted as an sRGB image. For the most part though, unless you really need the original authentic colours, I wouldn't go through all this hassle and do my colour grading work atop this basic gamma math.
this is based off my rough understanding of the hell that is colorspaces :) if you think this is all wrong, i'd gladly be corrected.
last updated 29th October 2022
images provided and written by moyevka